Import data in D365 FinOps via Azure Logic Apps – Dynamics Vision 365 (dynvision365.com)
Back again with another article in the Azure Logic Apps and D365 FinOps integration serie, this time we will continue exploring the data integration scenarios within D365 FinOps, to see how to create and use Azure Logic Apps as an intermediate connector or data bridge between different systems in a data import scenario with D365FinOps.
If you are interested to read more about an export scenario, you can read my previous article: Using Azure LogicApps and D365FinOps business events for data export scenarios
Data integration with Azure Logic Apps
One of the primary use cases of Azure Logic Apps is data integration. It provides a set of connectors and tools to connect with various data sources, such as Azure SQL Database, Azure Blob Storage, SharePoint, Salesforce, and many others. These connectors allow data to be accessed, transformed, and moved across different systems and applications.
Azure Logic Apps can be used for a variety of data integration scenarios, including:
Real-time data processing: Azure Logic Apps can be used to process real-time data streams from various sources, such as IoT devices, social media feeds, and application logs. The data can be analyzed and transformed in real-time, and actions can be taken based on the results.
Data migration: Azure Logic Apps can be used to migrate data from one system to another. It supports a wide range of data sources and destinations, and provides tools to transform and map the data as needed.
Workflow automation: Azure Logic Apps can be used to automate workflows that involve multiple systems and applications. For example, a workflow can be created to automatically transfer data from a web form to a database, send an email notification, and update a CRM system.
Overall, Azure Logic Apps is a powerful tool for data integration that can help streamline processes, improve efficiency, and reduce errors. It provides a flexible and scalable platform that can adapt to changing business needs and support complex data integration scenarios.
Today’s scenario : Import Data in D365FinOps through Azure Logic Apps
Importing data into D365 FinOps can be a complex and time-consuming process. However, using Azure Logic Apps can simplify the process and automate data import tasks. With Azure Logic Apps, it is possible to create workflows that extract data from various sources, transform it into the required format, and load it into D365FinOps.
In this scenario we will use the following components :
Azure Blob Storage :
Azure Blob storage as a cloud storage solution which will host the XML files to be imported later in D365FinOps via Azure Logic Apps.
In this example, our XML files have been uploaded previously to the blob.
Azure Logic Apps
Azure Logic Apps plays a crucial role in this data integration scenario, as data bridge solution for creating automated data integration tasks between the blob storage (Source) and D365FinOps application (Target). In this scenario, Azure Logic Apps will be used to extract and transform data from XML files stored in Azure Blob Storage and integrate it with D365FinOps.
Read data from XML files stored in Azure Blob Storage:
Azure Logic Apps will use the Azure Blob Storage connector.
The connector provides actions to access and read the contents of Blob Storage containers, including XML files.
Azure Logic Apps will be configured to trigger the workflow when new XML files are added to the Blob Storage container, via scheduled « Reccurence » trigger.
Once the workflow is triggered, Azure Logic Apps will get the blob content via « Retrieve the blob content » action, to extract data from the XML file and transform it into a JSON format that can be used in D365FinOps.
Import data from XML files stored in Azure Blob Storage to D365FinOps:
As we are going to import XML file format we will use the « HTTP » Post action to call the reccuring data import project from D365FinOps.
The results of the previous step will be an execution message status. The D365FinOps connector provides actions to execute and call different actions, here we will call the « GetMessageStatus » action to get the execution result status.
The Final step of the Workflow we will sent a confirmation mail to the concerned users indicating the execution results status.
Dynamics 365 For Finance and Operations
In this scenario we have created a custom data entity in D365FinOps that maps to the data structure of the XML data being imported from Azure Logic Apps via Data management workspace in D365FinOps.
To import data from Azure Logic Apps into Dynamics 365 for Finance and Operations (D365FinOps) via recurring data import job, the following configurations should be done:
New data import project
Map your data entity with the targeted XML file (which will be imported by Azure Logic Apps)
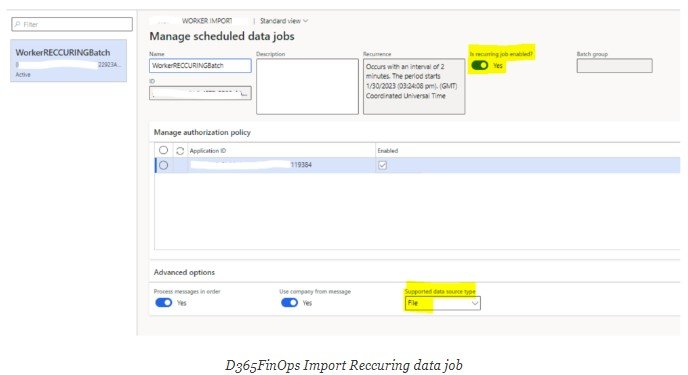
Configure the reccuring data import job in your D365FinOps import project. The reccuring data import job will be configured to run on a schedule, and it will automatically import data from the Azure Loigc Apps into D365FinOps
The configuration of a reccuring data job requires the creation of an Azure App registration. In this scenario we consider that you have already configured the following elements:
Creation of an Azure App Registration.
The client ID already added in the « Azure Active Directory » workspace
Select « File » as a supported data source type in the reccuring data import job.
Enable the scheduled data job
Things to be respected in the XML file
Before importing XML file into a data entity in Dynamics 365 for Finance and Operations via Azure Logic Apps, there are several things that must be respected in the XML file for the import to be successful. Here are some important things to consider:
XML file format: The XML file must be formatted according to the XML schema definition (XSD) for the target entity. This means that the XML file must include all the required elements and attributes, and follow the correct data type and formatting rules.
Data mapping: The XML file must match the data structure and data types of the target entity. This means that the XML file must have the same number of columns and data types as the target entity, and the data must be mapped correctly to the corresponding fields in the target entity.
Valid data: The XML file must contain valid data that meets the validation rules for the target entity. This means that the data must be within the acceptable ranges for each field, and any required fields must be populated.
The detailed Logic Apps workflow actions :
Now let’s explore more in details each action in the Logic Apps.
Trigger to run at cutomized time interval
The first step in any Logic App workflow is to define a trigger. This is an event that starts the workflow. In our case of data integration with D365FinOps, we will use « Reccurence » as a trigger of the workflow, you could use also « When a new blob is added or modified », which means when a new file added to a cloud storage service, or any other event that initiates the workflow.
In our case we have predefined times to call the Logic Apps.
Lists blobs in a container V2
The next step is to retrieve the data that needs to be integrated with D365FinOps. we are using the « lists blobs in a container » action to retrieve the list of blobs from our taget container in the Azure Blob Storage. This action critical in workflow to retrieve the list of XML files stored in Blob Storage and then perform further actions on each file.
To use the « List Blobs » action in Azure Logic Apps, you need to specify the following parameters:
Connection: This is the connection to your Azure Blob Storage account that you want to use.
Folder: This is the name of the container that you want to list the blobs for.
Example of folder name : /XMLFiles-new
The « List Blobs » action returns a JSON array that contains information about each blob in the specified container, including the blob name, size, content type, last modified date, etag, and other metadata. You can use this information to perform further actions on each blob, such as downloading, copying, or deleting the blob.
Executes a block of actions for each item in the input array
The « For Each » action in Azure Logic Apps is used to iterate over a collection of items and perform a set of actions on each item. Here we are looping the list of the extracted azure blobs from the previous step. this action is useful when you need to perform a repetitive task on a set of data, such as processing a list of files, sending multiple emails, or inserting data into. In our case we are going to import file by file inside the for each loop.
Here are the main parameters of the « For Each » action in Azure Logic Apps:
Items: This is the collection of items that you want to iterate over. The collection can be an array, an object, or a result set from a previous action, in our case we are iterating the blob list of files.
Concurrency Control (optional): This is an optional parameter that allows you to control the number of items that are processed simultaneously. For example, if you specify a concurrency of 5, the action will process up to 5 items at a time, and then move on to the next 5 items once the first batch is complete.
In our case we are iterating item by item (Max 1 at a time)
Encapsulate import to D365 actions inside a block of actions
The « Encapsulate » action in Azure Logic Apps is used to group a set of actions into a single block, making it easier to manage and reuse the logic in your workflow. This action can be useful when you have a complex set of actions that are used in multiple places in your workflow, or when you want to simplify the logic by grouping related actions together.
The advantage when you use the « Encapsulate » action, you can create a reusable block of logic that can be called from other parts of your workflow. This can help simplify your logic by grouping related actions together and reducing the number of actions that need to be managed in your workflow.
In our case we are encapsulating all the import data actions to D365FinOps in the same block.
Here are the main features of the « Encapsulate Import Into D365 data project » action in Azure Logic Apps:
Name: This is the name of the encapsulated block of actions. This is a required parameter and is used to reference the block of actions from other parts of your workflow.
Actions: This is the set of actions that are encapsulated in the block. These actions can be any valid actions in Azure Logic Apps. In our case we are using two actions inside the block, let’s discover them.
Retrieves blob contents using id to get the content file
Retrieving blob contents using an ID in Azure Logic Apps involves accessing a specific blob in a storage account and extracting the contents of that blob.
In our case we are extracting each blob inside the « for each » action.
In the « Blob » field, we are selecting the specific blob we want to retrieve by entering its ID in the blob. The ID is obtained from the « For Each » action in the workflow.
Example of blob ID : /XMLFiles-new/FileName01.xml
The output of this action is a combination of different metadata plus the binary data that represents the contents of the specified blob.
The « body » output is the actual content of the blob that we retrieved. We will use this output in the next step of the workflow, to start the data import via an HTTP Post Call.
HTTP Call to import data
The HTTP action in Azure Logic Apps can be used to import data into Dynamics 365 Finance and Operations (D365FinOps) by sending a POST request to the Data Management API. The Data Management API is a RESTful API that allows you to create, read, update, and delete data in D365FinOps.
Here are the key steps involved in using the HTTP action to import data into D365FinOps:
Add the « HTTP » action to your Logic App workflow.
Set the HTTP method to « POST » to indicate that you want to create a new record in D365FinOps.
Enter the URL of the Data Management API endpoint for creating records. This endpoint is typically in the format : https://<D365FinOps environment URL>/api/connector/enqueue/%7B<Reccuring Data Job ID of your Data import Project>%7D?entity=<Data%20EntityName>
Include the necessary headers in the HTTP request, such as the « Authorization » header for authentication and the « Content-Type » header for specifying the data format (e.g. JSON, XML).
Here we are using the » x-ms-dyn-externalidentifier » header > The associated value is the File Name we are retrieving from the loop.
Include the request body in the HTTP request, which contains the data you want to import into D365FinOps. The structure of the request body depends on the entity you are importing data into and the data format you are using (e.g. JSON, XML).
The authentication type for the HTTP action in Azure Logic Apps can be specified in the « Authentication » tab of the action configuration.
Azure Logic Apps supports several authentication methods, including:
No authentication: This option is suitable if the web service or API you are calling does not require authentication.
Basic authentication: This option allows you to provide a username and password to authenticate the request. The username and password are included in the « Authorization » header of the HTTP request.
OAuth (The type we are using in our scenario): This option allows you to use OAuth 2.0 authentication to obtain an access token that can be used to authenticate the request. You will need to provide the OAuth 2.0 endpoint URL, client ID, client secret, and other relevant parameters.
Managed identity: This option allows you to use the managed identity of your Logic App to authenticate the request. This is useful if you want to grant your Logic App access to resources in Azure without having to store authentication credentials.
Encapsulate execution results inside a block of actions
As we did with the import action, here we are encapsulating again another block of actions to check the execution message status and « Delay » action inside the same block.
When we encapsulate a set of actions, we have to define inputs and outputs for the encapsulated logic app, which can be used by other actions in the workflow. This makes it easy to reuse the same logic in multiple places without having to repeat the same actions.
Now let’s discover the actions inside.
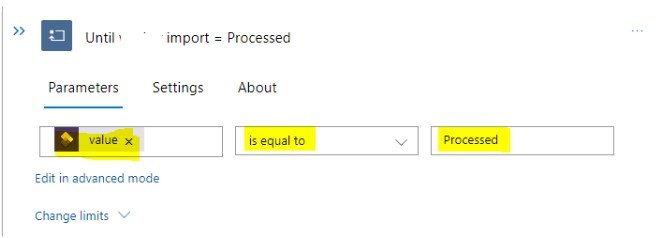
Do Until the execution status = Processed
Before getting the final result of your data import to D365FinOps, you have to add a « Do Until » action to verify the current message status of the data batch job.
The « Do Until » action in Azure Logic Apps plays the role of a loop control action that allows you to repeat a set of actions until a specific condition is met. In our case the final status of the data import have to be « Processed » otherwise the import will not successed and we have to manage the different exception results.
The « Delay » action allows to pause the execution of the workflow for a specified amount of time. It is used here to introduce a time delay between the action of : next loop in the « Do Until » and the « Get import execution status » action in the workflow, time before executing the next action.
Useful in our case to wait « execute action » complete the operation before proceeding with the rest of the workflow.
Get import exeuction results
This is the important step inside the « Do Until » block, the goal here is to get the data import job status.
The « DataManagementDefinitionGroups-GetMessageStatus » action is one of the actions available in the « Execute Action » connector for D365 FinOps in Azure Logic Apps.
In our case it will be used to retrieve the status of the message that was submitted to the data management framework in D365 FinOps.
Once the import job message is submitted to the data management framework, it will be processed asynchronously in the background. The « DataManagementDefinitionGroups-GetMessageStatus » action allows you to check the status of a specific message to see if it has completed processing or if there are any errors or warnings that need to be addressed.
To use the « DataManagementDefinitionGroups-GetMessageStatus » action, you will need to provide the message ID for the message you want to retrieve the status of. In our case the message ID have been generated from the previous step when we have submited the HTTP Post Call to the data management framework.
Here is an example of an output message ID :
Execution results monitoring and exception handling
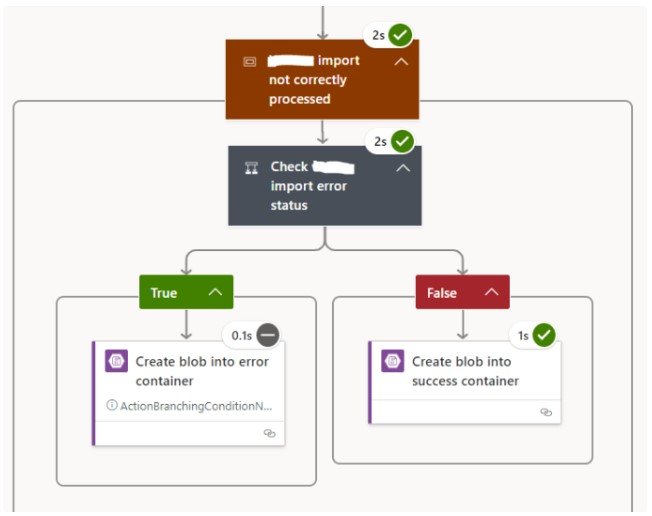
The final step in our workflow is to manage the import execution results as they come from the previous step, the results can be : Error/ Processed with Error….
In our case we have added the conditional control action to evaluate the multiple conditions and status and execute different actions based on the result of each condition to push the XML file into « Success container » or « Error container ».
Check the reccuring import results in D365FinOps
Recurring data job import in D365FinOps allows to set up a scheduled job that automatically imports data from a file or external source on a regular basis. Useful in our case to keep D365FinOps data entities up-to-date with data from XML files on a regular schedule.
Once your Logic Apps workflow have been successfully executed, you will be able to see the result of your reccuring data job directly from your data import project.
If you enjoyed this post, I’d be very grateful if you’d help it spread by emailing it to a friend, or sharing it on Linkedin , Twitter or Facebook. Thank you !


